

In today’s blog, we are sharing the WooCommerce tutorial. Creating an online business is a challenging affair. In an industry with millions of websites and thousands of competitors, creating a site that attracts customers and adds value in multiple ways is something not all brands can achieve.
One of the basic needs for an online business is an eCommerce website. This is the online platform where you sell your product or service. Just like how a physical store is a basis for any offline business, your website is what is going to pull people in to try your offerings.
You can always get in touch with expert designers to create your website. This is easy but is going to cost you. Larger businesses and businesses with financial backups prefer outsourcing website creation to those who know the process right.
For small businesses and those already struggling with the financial burdens of starting up, this can be slightly challenging. In such cases, many business owners opt to use free tools to create their websites, at least in the initial stages. WooCommerce is one such tool to help build a website and maintain it. This article will take you through a detailed WooCommerce tutorial with steps and explanations to help build your website on WooCommerce.
What is WooCommerce?
A lot of businesses are interested in creating their own websites now using one or more of the tools available in the market. One such tool is WooCommerce. This is an open-source platform for building and managing a website that runs on WordPress.
Established in 2008, WooCommerce has come a long way from just having a handful of themes for website builders to offering thousands of customizations and end-to-end solutions for small and large businesses alike. The brand calls itself the ‘most customizable eCommerce Platform’ in the market right now.
Is that true? Check out this WooCommerce tutorial and you can find out for yourself.
What features of WooCommerce make it special?
Comparison between WooCommerce and Shopify
All over the internet, customers who have used WooCommerce have left behind reviews and feedback for this platform, and here is a list of features that most of them have liked.
- WooCommerce is a completely open-source platform and this means that if needed, you can create a website and run it fully free. The only things you need to pay for initially are the hosting charges and a domain name. It is definitely much cheaper than its competitors like Shopify.
- WooCommerce lets you customize like crazy. You can make changes to the themes and their coding. You can use a variety of paid and free plugins available on the platform to create a website that looks and works like nothing else in the market.
- WooCommerce needs basic designing skills and technical knowledge to get it right. You, at least, need to have the patience to learn if you are using it all by yourself.
- There are umpteen numbers of paid and free add-ons that integrate third-party services and improve the features of your website on WooCommerce
- It is not impossible to create a professional-looking and exclusive website all on your own when you follow the right WooCommerce tutorial.
Shopify is the closest competitor to WooCommerce and at the end of the day, customers end up choosing between the two. Here is Netilly’s blog on a detailed comparison between WooCommerce and Shopify. You will be able to compare the pros and cons of both these platforms easily after reading this.
Basic requisites to create a WooCommerce store?
You can either create a new website using WooCommerce or extend and add more features to your existing website using the plugins this platform offers. You will need WordPress hosting to build your store. This has to be paid for. You also need a domain name of your choice. This also has to be paid for. If you want an SSL certification (HTTPS:// instead of HTTP: //), then that has to be paid for too.
Once all these are done, you can set up your store easily.
Steps to set up an eCommerce website with WooCommerce tutorial
Step 1: Getting started with WooCommerce
Visit WooCommerce’s website and look through the features offered, the kind of add-ons you can use, and other factors that may interest you. Before you decide to narrow down on a platform to build your store in, knowing the basics is important.
Let’s go through this WooCommerce tutorial with an example. We will try and build a jewelry brand on the platform. Different website hosts can help your startup. WordPress recommends the following.
- BlueHost
- DreamHost
- SiteGround
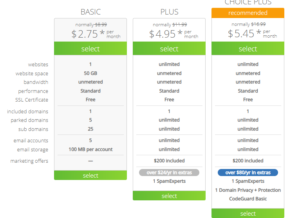
With BlueHost, there are a variety of plans to start with.
Choose your preferred plan. You will be asked to choose your domain name next. You can check what domain names are available easily on BlueHost. While a lot of extensions are available, the .com extension is preferred.
Next, create an account and make the payment based on what package you have chosen. Once all this is done, your hosting website, BlueHost in this example, will give you a dashboard from where you can install WordPress and WooCommerce.
Step 2: Setting up WordPress

You will have to log in to WordPress to start setting it up. If you use hosting platforms, they automatically install and give you access to WordPress. If not, you need to sign up on WordPress.
Once you have access to WordPress, you can go to the Dashboard>Settings and edit the general settings.
Browse through the rest of the settings and make relevant changes wherever needed.
Step 3: Installing and setting up WooCommerce
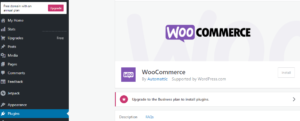
Once your WordPress installation and setup are done, you need to install the WooCommerce Plugin. In the WordPress dashboard, click Plugin and choose WooCommerce. You can also search for WooCommerce in the search tab.
Install and activate the plugin. You will have to have a business account to install plugins.
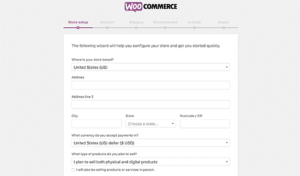
Step 4: Access the Setup Wizard
Once you install WooCommerce, you will be taken through a series of setup processes. You will be asked multiple questions to identify the kind of store you plan to start. You can change certain key settings here and it is recommended you complete this without skipping.
Step 5: Choose Details
-
Choose the Industry Choose the Product Type
WooCommerce will next ask you for details about your industry and product type. We will be choosing jewelry here.
The next question will be about the type of product you sell. We will be choosing ‘physical products’ here.
The next question will be how customers will pay for your products/services. We will choose one-time payments.
The 5th step is how you want to install WooCommerce. We will be getting WooCommerce pre-installed.
Complete installation and the first step is set.
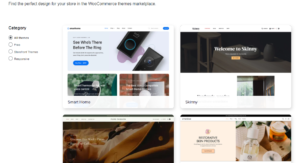
Step 6: Choosing a WooCommerce template & theme
There are thousands of themes on WooCommerce for you to choose from. This is one of the most fun parts of the WooCommerce tutorial. You can choose between three kinds of themes:
- Free themes
- Storefront themes
- Responsive themes
If you want a really professional website, skip the free themes and opt for the responsive ones. These look great on all operating systems and devices.
Step 7: Adding products in WooCommerce
It is very easy for you to add products to the WooCommerce dashboard. All you need to do is click on Products>Add new.
You can enter the product title, product description, category, and other details like inventory, shipping, sale price, and other attributes.

Step 8: Installing WooCommerce plugins and extensions
If there is one step that makes a difference between a mediocre and an amazing website, it is this point. In this WooCommerce tutorial, this is a step you need to spend a lot of time researching on. There are thousands of extensions and plugins for WooCommerce and some of them totally change the look and efficiency of your website.
You can use plugins and extensions to add payment options, ask for feedback, manage images, help with SEO, add pricing tables and so much more. Here are some of the best WooCommerce plugins for you in 2021.
- Google Analytics
- WooCommerce Shipping
- HubSpot
- Google Ads
- Square Payments
- Paypal
Step 9: WooCommerce Resources to grow your online store
Once your website is all set and you have added products and made it live, here are some resources you should start building to get more conversions and to stay busy selling your products and services.
- Encourage your customers to sign up and give their email IDs. A majority of people will abandon their carts and leave halfway through. Connecting via email will help get better conversions.
- Use market research to identify the right target audience. Make sure you are reaching out to these audiences in multiple ways to encourage them to try out your website.
- Create campaigns and sale giveaways to get more customers. You can install some good Campaign Monitor plugin to automate plugins and get repeat customers.
Step 10: Setup Payment Gateway
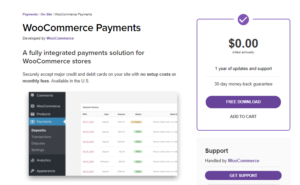
There are so many types of payment gateway extensions and plugins you can use to set up your payment gateway. WooCommerce Payments is a one-stop solution for you to collect payments, track cash flow, manage refunds, and check your revenue.
Apart from this you can install the below top payment gateway plugins on WooCommerce and make use of them to collect and manage payments.
- Amazon Pay
- PayPal
- Stripe
- Square
- PayFast
Step 11: Set up Shipping
Again, WooCommerce has its own integrated built-in shipping plugin called WooCommerce Shipping. You can install this and the plugin will take over most of the shipping processes starting from creating labels to printing shipping summary and identifying exact shipping rates. While WooCommerce Shipping is fully integrated for the US, it will soon reach the rest of the countries.
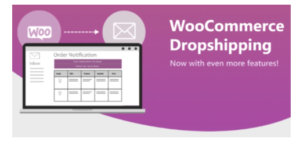
WooCommerce is also an excellent dropshipping platform. Dropshipping is a process where the business owner neither maintains warehouses nor ships from his end. Once an order is processed, sellers take over the order shipping.
Step 12: Check That WooCommerce Is Configured Correctly
Once your website is up and running, try visiting the website like a customer and order products/services. See if the website is reactive and if the payment gateway is smooth. Check for potential bugs that can disappoint your actual customers.
Once you place an order, go backend and process it. See how efficient the support and plugins are. Do this a couple of times until you get the confidence that the system works seamlessly.
Step 13: Extend Functionality Using Plugins
Even after your website is successfully running and getting you orders, you have to keep check out this WooCommerce tutorial regularly. You have to especially check the plugins. Plugins keep getting upgraded and new plugins are added every day. Some of these may be game-changers for your business. Make sure to keep a lookout for good plugins on the WooCommerce forums and other discussion boards.
WooCommerce FAQs
WooCommerce is an absolutely exciting platform to create an eCommerce store and run it successfully. Here are some additional questions that you may have about the platform.
-
Can you customize themes?
The basics of changes in themes like adding your logo and changing font sizes can be done in all free and paid themes. However, if you want to tweak the platform or the basic settings, then you should have knowledge of HSS and CSS. It is definitely possible to make endless customizations though.
-
How can you get help?
Since WooCommerce is open-source software, you cannot expect someone to handhold you all through the process. What you can do is check out the massive amounts of documentation and video helps available.
You will also be able to chat with someone from the WooCommerce team if you need further help.
-
Are plugins and extensions a one-time buy?
No. Most times, these are subscription-based charges and you will be billed for them annually. WooCommerce will get back to you in advance when your subscription is up for renewal.
-
What if you don’t like an extension from WooCommerce?
Most of the extensions come with a 30-day moneyback guarantee and you will be able to get your money back if you are not happy with the product.
-
Who are WooCommerce’s competitors?
Some of the close competitors of WooCommerce are Shopify, WPForms, BigCommerce, and Magento Open Source.
Wrapping Up
This WooCommerce tutorial must have given you complete steps and details on how to set up an eCommerce website easily. If you have been waiting to build your own website and have the time and energy to do so, definitely use WooCommerce. If you want some handholding, then there are experts who can help take over this task for you. Get in touch with us and we will help you build the best website in the market.